User Guide Reader RP Client

Features

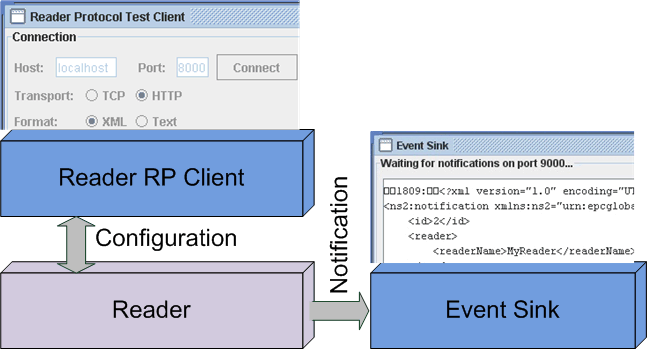
The Fosstrak Reader RP Client is a Java Swing-based graphical user interface to execute commands and communicate with a RFID reader that implements the EPCglobal Reader Protocol Version 1.1. The Reader Client supports the following elements of the protocol:

  • Transport Binding: TCP and HTTP
  • Message Binding: XML and Text
  • Synchronous and Asynchronous Messaging (Notification Channels)
  • Triggers
  • Data Selectors

Additional to the Test Client, there are two versions of an event sink contained in the Reader RP Client module. The EventSinkUI displays a graphical user interface with a text field to show messages received. The EventSink uses the console to output messages received. Mentioning an event sink in this user guide will apply to both versions.

The event sink is started separately and acts as an end point to a notification channel of the reader. Notifications received from the reader are displayed in the particular output field - text area or console respectively.

Field of Application

  • Communicate with a reader via the EPCglobal Reader Protocol Version 1.1 using a graphical front end to create and send commands.
  • Receive and display notification messages from a reader.

Installing the Fosstrak RP Client

The following instructions show how to install the Fosstrak Reader RP Client:

  • Download the Reader RP Client binaries with the dependencies included from the download section of the website.
  • Unzip the downloaded file.
  • Make sure a JRE 1.5 or higher is installed and it is added to the path variable.

First Steps

  • Start the Reader RP Client instance in one of the following ways:
    • Invoke the executable jar
    • In a console execute
      java -jar <path-to>/reader-rp-client-<version>.jar
      
    • In a console execute
      java -cp <path-to>/reader-rp-client-<version>.jar org.fosstrak.reader.rp.client.TestClient
      
  • Enter the IP address and port of a RP compatible reader
  • Select the appropriate transport and message binding
  • Click the "Connect" Button
  • Select a sample command from the drop-down menus (e.g. ReaderDevice.GetName())
  • Generate the message by hitting the "Create Command" button
  • Transmit the command to the reader instance by clicking on the "Send" button

Display Notification Messages

  • Start the class org.fosstrak.reader.rp.client.EventSinkUI in the jar file with the following command:
    java -cp <path-to>/reader-rp-client-<version>.jar org.fosstrak.reader.rp.client.EventSinkUI [port]
    
  • As the port argument use the TCP port to which the reader will be sending the notification messages. This port has to be specified later when defining the notification channel for the reader. The default port 9999.

Simple Reader Configuration

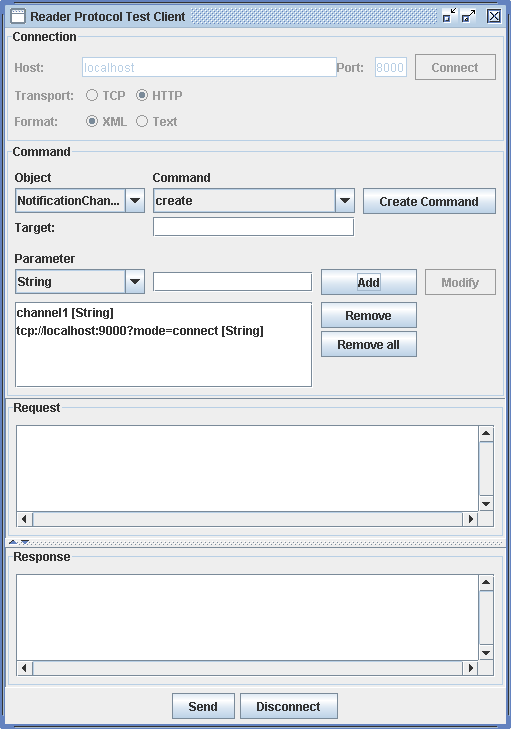
This section shows an example reader configuration procedure using the Reader RP Client.

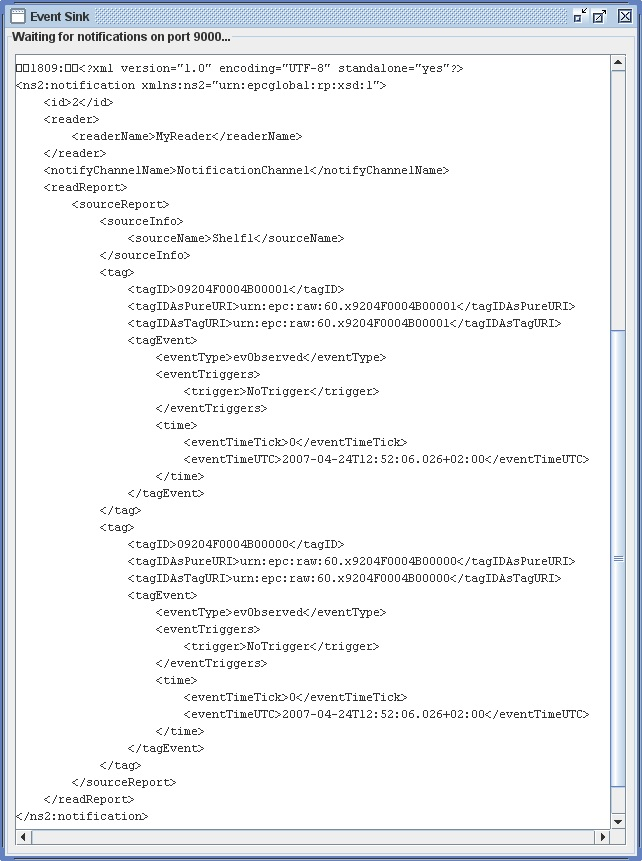
The setup consists of an EventSinkUI listening on port 9999 and an Fosstrak Reader using the graphical simulator. Both are runnning on the same computer as the Reader RP Client. The simulator has a source with the name 'Shelf1'.

  1. Start the Reader, EventSinkUI and Reader RP Client. See the documentation of the Reader, EventSinkUI and Client for instructions on how to do this.
  2. Connect to the reader on localhost port 8000 with transport binding HTTP and format XML.
  3. Create a read trigger:
    • Select 'Trigger' in the Object drop-down list.
    • Select 'create' in the Command drop-down list.
    • Add a String parameter 'rt' (name), 'TIMER' (type) and 'ms=2000' (timer value) to the parameter list.
    • Hit the 'Create Command' button. The command in the Request text field should look like this:
      <?xml version="1.0" encoding="UTF-8" standalone="yes"?>
      <ns2:command xmlns:ns2="urn:epcglobal:rp:xsd:1">
          <id>2</id>
          <targetName></targetName>
          <trigger>
              <create>
                  <name>rt</name>
                  <triggerType>TIMER</triggerType>
                  <triggerValue>ms=2000</triggerValue>
              </create>
          </trigger>
      </ns2:command>
      
    • Hit the 'Send' button. The reply in the Response text field should look like this:
      HTTP/1.1 200 OK
      RP-Receiver-Signature: RPR1
      RP-Spec-Version-OK: yes
      RP-Request-Content-Type-OK: yes
      RP-Response-Content-Type-OK: yes
      RP-Response-ACKNAK-OK: yes
      Content-Type: text/xml; charset=utf-8
      Content-Length: 269
      
      <?xml version="1.0" encoding="UTF-8" standalone="yes"?>
      <ns2:reply xmlns:ns2="urn:epcglobal:rp:xsd:1">
          <id>2</id>
          <resultCode>0</resultCode>
          <trigger>
              <create>
                  <returnValue>rt</returnValue>
              </create>
          </trigger>
      </ns2:reply>
      
  4. Create a notification trigger:
    • Select 'Trigger' in the Object drop-down list.
    • Select 'create' in the Command drop-down list.
    • Add a String parameter 'nt' (name), 'TIMER' (type) and 'ms=2000' (timer value) to the parameter list.
    • Hit the 'Create Command' button. The command in the Request text field should look like this:
      <?xml version="1.0" encoding="UTF-8" standalone="yes"?>
      <ns2:command xmlns:ns2="urn:epcglobal:rp:xsd:1">
          <id>4</id>
          <targetName></targetName>
          <trigger>
              <create>
                  <name>nt</name>
                  <triggerType>TIMER</triggerType>
                  <triggerValue>ms=2000</triggerValue>
              </create>
          </trigger>
      </ns2:command>
      
    • Hit the 'Send' button. The reply in the Response text field without the HTTP header should look like this:
      <?xml version="1.0" encoding="UTF-8" standalone="yes"?>
      <ns2:reply xmlns:ns2="urn:epcglobal:rp:xsd:1">
          <id>4</id>
          <resultCode>0</resultCode>
          <trigger>
              <create>
                  <returnValue>nt</returnValue>
              </create>
          </trigger>
      </ns2:reply>
      
  5. Create a notification channel:
    • Select 'NotificationChannel' in the Object drop-down list.
    • Select 'create' in the Command drop-down list.
    • Add a String parameter 'nc' (name) and 'tcp://localhost:9999?mode=connect' (address) to the parameter list.
    • Hit the 'Create Command' button. The command in the Request text field should look like this:
      <?xml version="1.0" encoding="UTF-8" standalone="yes"?>
      <ns2:command xmlns:ns2="urn:epcglobal:rp:xsd:1">
          <id>6</id>
          <targetName></targetName>
          <notificationChannel>
              <create>
                  <name>nc</name>
                  <address>http://localhost:9999?mode=connect</address>
              </create>
          </notificationChannel>
      </ns2:command>
      
    • Hit the 'Send' button. The reply in the Response text field without the HTTP header should look like this:
      <?xml version="1.0" encoding="UTF-8" standalone="yes"?>
      <ns2:reply xmlns:ns2="urn:epcglobal:rp:xsd:1">
          <id>6</id>
          <resultCode>0</resultCode>
          <notificationChannel>
              <create>
                  <returnValue>nc</returnValue>
              </create>
          </notificationChannel>
      </ns2:reply>
      
  6. Add the notification trigger to the notification channel:
    • Select 'NotificationChannel' in the Object drop-down list.
    • Select 'addNotificationTriggers' in the Command drop-down list.
    • Write 'nc' as the target name in the Target text field.
    • Add an Array parameter 'nt' (trigger name) to the parameter list.
    • Hit the 'Create Command' button. The command in the Request text field should look like this:
      <?xml version="1.0" encoding="UTF-8" standalone="yes"?>
      <ns2:command xmlns:ns2="urn:epcglobal:rp:xsd:1">
          <id>8</id>
          <targetName>nc</targetName>
          <notificationChannel>
              <addNotificationTriggers>
                  <triggers>
                      <list>
                          <value>nt</value>
                      </list>
                  </triggers>
              </addNotificationTriggers>
          </notificationChannel>
      </ns2:command>
      
    • Hit the 'Send' button. The reply in the Response text field without the HTTP header should look like this:
      <?xml version="1.0" encoding="UTF-8" standalone="yes"?>
      <ns2:reply xmlns:ns2="urn:epcglobal:rp:xsd:1">
          <id>8</id>
          <resultCode>0</resultCode>
          <notificationChannel>
              <addNotificationTriggers/>
          </notificationChannel>
      </ns2:reply>
      
  7. Add the source to the notification channel:
    • Select 'NotificationChannel' in the Object drop-down list.
    • Select 'addSources' in the Command drop-down list.
    • Write 'nc' as the target name in the Target text field.
    • Add an Array parameter 'Shelf1' (source name) to the parameter list.
    • Hit the 'Create Command' button. The command in the Request text field should look like this:
      <?xml version="1.0" encoding="UTF-8" standalone="yes"?>
      <ns2:command xmlns:ns2="urn:epcglobal:rp:xsd:1">
          <id>10</id>
          <targetName>nc</targetName>
          <notificationChannel>
              <addSources>
                  <sources>
                      <list>
                          <value>Shelf1</value>
                      </list>
                  </sources>
              </addSources>
          </notificationChannel>
      </ns2:command>
      
    • Hit the 'Send' button. The reply in the Response text field without the HTTP header should look like this:
      <?xml version="1.0" encoding="UTF-8" standalone="yes"?>
      <ns2:reply xmlns:ns2="urn:epcglobal:rp:xsd:1">
          <id>10</id>
          <resultCode>0</resultCode>
          <notificationChannel>
              <addSources/>
          </notificationChannel>
      </ns2:reply>
      
  8. Add the read trigger to the source:
    • Select 'Source' in the Object drop-down list.
    • Select 'addReadTriggers' in the Command drop-down list.
    • Write 'Shelf1' as the target name in the Target text field.
    • Add an Array parameter 'rt' (read trigger name) to the parameter list.
    • Hit the 'Create Command' button. The command in the Request text field should look like this:
      <?xml version="1.0" encoding="UTF-8" standalone="yes"?>
      <ns2:command xmlns:ns2="urn:epcglobal:rp:xsd:1">
          <id>12</id>
          <targetName>Shelf1</targetName>
          <source>
              <addReadTriggers>
                  <triggers>
                      <list>
                          <value>rt</value>
                      </list>
                  </triggers>
              </addReadTriggers>
          </source>
      </ns2:command>
      
    • Hit the 'Send' button. The reply in the Response text field without the HTTP header should look like this:
      <?xml version="1.0" encoding="UTF-8" standalone="yes"?>
      <ns2:reply xmlns:ns2="urn:epcglobal:rp:xsd:1">
          <id>12</id>
          <resultCode>0</resultCode>
          <source>
              <addReadTriggers/>
          </source>
      </ns2:reply>
      
  9. The reader is now configured. Add a new tag to the Fosstrak Reader Simulator and drag it over the Antenna with the name 'Shelf1'. The event sink should show a notification text formated in XML. An example of such a notification could look like this:
    <?xml version="1.0" encoding="UTF-8" standalone="yes"?>
    <ns2:notification xmlns:ns2="urn:epcglobal:rp:xsd:1">
        <id>1</id>
        <reader>
            <readerEPC>ReaderEPC</readerEPC>
            <readerName>MyReader</readerName>
            <readerHandle>0</readerHandle>
            <readerRole>ReaderRole</readerRole>
        </reader>
        <notifyTriggerName>NotificationTrigger</notifyTriggerName>
        <notifyChannelName>NotificationChannel</notifyChannelName>
        <readReport>
            <sourceReport>
                <sourceInfo>
                    <sourceName>Shelf1</sourceName>
                    <sourceFrequency>0</sourceFrequency>
                    <sourceProtocol>not supported</sourceProtocol>
                </sourceInfo>
                <tag>
                    <tagID>9204F0004B000000</tagID>
                    <tagIDAsPureURI>urn:epc:raw:64.x9204F0004B000000</tagIDAsPureURI>
                    <tagIDAsTagURI>urn:epc:raw:64.x9204F0004B000000</tagIDAsTagURI>
                    <tagType>not supported</tagType>
                    <tagEvent>
                        <eventType>evGlimpsed</eventType>
                        <eventTriggers>
                            <trigger>ReadTrigger</trigger>
                        </eventTriggers>
                        <time>
                            <eventTimeTick>1199287632796</eventTimeTick>
                            <eventTimeUTC>2008-01-02T16:27:12.796+01:00</eventTimeUTC>
                        </time>
                    </tagEvent>
                    <tagEvent>
                        <eventType>evNew</eventType>
                        <eventTriggers>
                            <trigger>NoTrigger</trigger>
                        </eventTriggers>
                        <time>
                            <eventTimeTick>1199287632796</eventTimeTick>
                            <eventTimeUTC>2008-01-02T16:27:12.796+01:00</eventTimeUTC>
                        </time>
                    </tagEvent>
                </tag>
            </sourceReport>
        </readReport>
    </ns2:notification>